

The rear foot elevated split squat, frequently referred to as the Bulgarian split squat, is one of the most effective lower-body exercises you can program. Setting up in a split stance with the rear foot elevated turns the movement into a semi-unilateral exercise. This position shifts the vast majority of the load onto the front working leg while taking it through a deep squatting pattern.
Want to take your training up a notch?
Use promo code SAVE10 to get 10% off any program right now. https://citizenathletics.com
Learn more about our training at the bottom.
What Muscles Does the Rear Foot Elevated Split Squat Work?
The muscle recruitment of the rear foot elevated split squat comes down to the joint actions occurring at the hips, knees, and trunk:
- Quads (Front Leg): The lead knee travels through knee flexion, heavily loading the quadriceps.
- Glutes (Front Leg): The lead hip moves through hip flexion, placing high demands on the glutes to extend back up.
- Quads (Rear Leg): The back leg experiences a stretch and a challenge to the quadriceps as you sit back and down into the descent.
- Trunk: The torso requires significant core and spinal stability to maintain positioning throughout the rep.
- Secondary Stabilizers: The hamstrings, adductors, and lateral hip/glute muscles receive some challenge, though to a very minimal degree compared to the primary movers.
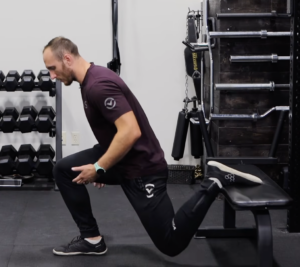
Why Use the Rear Foot Elevated Split Squat?
Traditional single-leg exercises, such as a true single-leg pistol squat, introduce a massive balance demand that often limits how much resistance you can actually handle.
The rear foot elevated split squat solves this problem:
- Reduced balance demands, higher loading: Elevating the back foot provides a point of support that reduces balance constraints, allowing you to focus on truly loading and challenging the target musculature.
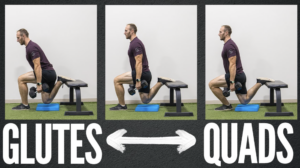
- Customizable joint angles: By altering your knee position, hip position, and torso angle at the bottom of the movement, you can bias different muscle groups:
- For more glute emphasis: Maintain a more vertical shin, hinge your torso forward, bend over more at the hip, and sit back into the glute.
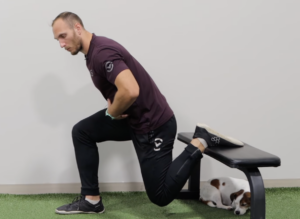
- For more quad emphasis: Drive the knee forward over the toes and keep the torso upright to place maximum mechanical tension on the quadriceps.
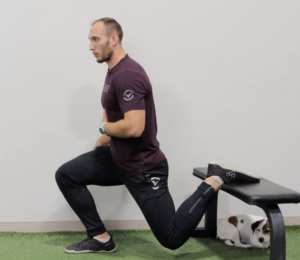
- For more glute emphasis: Maintain a more vertical shin, hinge your torso forward, bend over more at the hip, and sit back into the glute.
- Pelvic freedom vs. bilateral squats: Bilateral squats lock both feet to the floor, frequently causing a pinch or impingement in the hip for individuals with structural restrictions. In a rear foot elevated split squat, you can freely reposition the leg and pelvis, making it an exceptional alternative for anyone who deals with hip discomfort during bilateral movements.
How to Set Up the Movement Step-by-Step
A solid repetition starts with a dialed-in setup. Follow these steps to find your ideal stance:
1. Select Your Rear Foot Support
You need a stable surface at roughly the right height. Options include:
- A standard flat bench
- A dedicated leg roller / single-leg squat stand
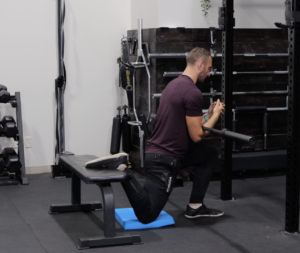
- A barbell set in a rack, fitted with a squat pad or wrapped in a foam roller to keep the back of the ankle comfortable
2. Determine Your Walkout Distance
Your starting distance from the bench depends on your goals and your personal mobility:
- Target Muscle: A closer stance allows more forward knee travel for the quads, while a longer stance creates greater hip flexion to bias the glutes.
- Hip Extension Mobility: As you descend, the rear hip must extend. If you lack hip extension, especially with the knee bent, a long stance will feel uncomfortable. A closer stance is better suited for limited hip extension.
- Ankle Dorsiflexion Mobility: If you have stiff ankles that limit forward knee travel, a close stance will be difficult to hit comfortably; taking your foot further out accommodates restricted dorsiflexion.
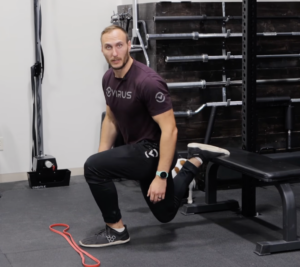
3. Mark Your Foot Placement
Once you find the ideal position for your mechanics, place a marker on the floor (such as an exercise band). Lining your front toes up to that marker ensures consistent stance depth and width across every set.
4. Use a Knee Pad for Depth Consistency
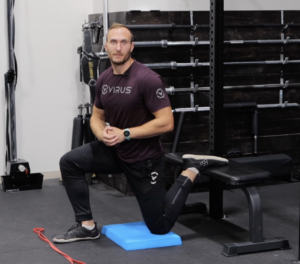
Place a small pad directly beneath your rear knee. Lightly touching the pad on each repetition serves as an objective reference point to ensure you hit consistent, honest depth rather than cutting reps short.
5. Position Your Rear Foot (Laces Down vs. Toes Dug In)
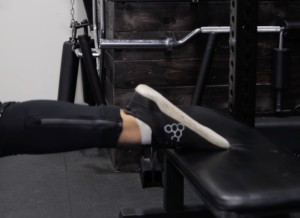
Place the rear foot flat with laces down / foot flipped back, rather than digging your toes into the bench. Digging the toes in causes you to push off the back leg, demands excessive big-toe extension, and places higher stress on back-leg knee flexion and hip extension. Laying the top of the foot flat keeps the work focused on the front working leg.
Common Mistakes to Avoid
Avoiding these technical errors will keep the exercise productive and joint-friendly:
- Using a bench that is too high: A standard bench does not fit every body type. Shorter lifters often find standard benches too tall, while taller lifters may find them too low. Aim for a support height that aligns roughly with the top of your tibia / upper shin bone. Adjust height using a lower surface or by elevating the front foot on plates.
- Setting up too far out or too close in: Striding out too far overextends and irritates the back hip flexor. Stepping too close prevents full depth and places excessive, uncomfortable strain on the rear knee.
- Treating it like a tightrope walk (Balance issues): Placing the front foot directly in line with the rear foot turns the exercise into a balance test. Instead, set your feet hip-width apart, left leg in line with the left hip, right leg in line with the right hip.
- Failing to assist balance when chasing hypertrophy: If your primary goal is muscle growth or pure strength, balance should not be the limiting factor. Hold a dowel or support stick in one hand to stabilize your body while holding a heavy dumbbell in the other.
- Cutting depth short: Halving your range of motion significantly reduces the hypertrophy stimulus. Use a foam pad on the floor and bring the back knee down to touch it every single rep. If mobility is limited, stack two pads and remove layers over time as range improves.
- Going too light: Many lifters who can squat several hundred pounds pick up 20-pound dumbbells for split squats. Because this is essentially a single-leg exercise, aim to handle serious weight. As a benchmark, aim to build up toward roughly 50% of your back squat capacity across your working sets.
How to Load the Rear Foot Elevated Split Squat
There are multiple loading configurations depending on equipment availability and trunk demands:
Dumbbell & Kettlebell Variations
- Contralateral / Offset Load: Holding a single weight in the hand opposite the working leg (the back-leg side) alters rotational core demand and challenges the hip stabilizers.
- Ipsilateral Load: Holding a single weight on the same side as the working front leg shifts the center of gravity and lateral hip demands.
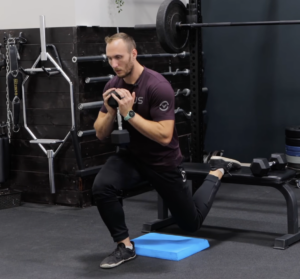
- Bilateral Dumbbells: Holding a dumbbell in each hand minimizes balance instability and allows you to maximize external loading.
- Goblet Position: Holding a dumbbell or kettlebell against your chest increases trunk extension demands and naturally encourages a slightly more upright torso for quad loading.
Barbell Variations
Barbells allow you to push loading significantly higher than dumbbells without being limited by grip strength:
- Front Rack: Held in a clean grip or cross-arm style, increasing upper-back and anterior core engagement.
- Back Rack: Positioned across the upper back just like a traditional back squat, permitting the highest possible loading capacity.
- Zercher Position: Cradling the barbell in the crooks of your elbows (use an elbow pad or bar pad for comfort), demanding massive trunk stability.
Alternative Exercises
If you cannot perform a rear foot elevated split squat due to mobility constraints, equipment availability, or pain, you can regress to:
- Standard Split Squat: Keep both feet on the floor without elevating the back foot to eliminate hip extension restrictions.
- Bilateral Squat Variations: Traditional two-legged squat variations.
- Other Single-Leg Variations: Step-ups, lunges, and single-leg squat progressions.
Level Up Your Training With Citizen Athletics
Maximizing your strength and building resilient legs requires structured programming, smart exercise selection, and progressive overload. Explore our full roster of evidence-based training programs over at Citizen Athletics to take the guesswork out of your workouts.
- Built for Athletics: Our premium training system engineered to optimize raw strength, power, and high-level movement efficiency.
- Sustainable Strength: The ultimate flagship framework designed for busy individuals looking to lift heavy, build muscle, and remain highly athletic for life.
Watch the Technical Breakdown
Prefer to see a visual of every setup cue, biomechanical angle, and loading variation? Watch the full video walkthrough here.