

The hip thrust is one of the premier exercises for targeting the glutes. It is a bridging variation performed with elevated shoulders, where you drive your hips upward into hip extension, one of the primary actions of the gluteal muscles.
Targeting the glutes effectively requires dialed-in mechanics. Below is the full breakdown of what the movement works, why it outperforms traditional compound lifts for glute isolation, exact setup steps, common technique faults, and progression variations.
Want to take your training up a notch?
Use promo code SAVE10 to get 10% off any program right now. https://citizenathletics.com
Learn more about our training at the bottom.
Anatomy: What Does the Hip Thrust Train?
The hip thrust strongly emphasizes the gluteus maximus, the largest muscle of the glute complex. Depending on execution, it also engages several supporting muscles:
- Gluteus Medius: Positioned on the lateral aspect of the hip, its recruitment is directly influenced by foot width and rotation.
- Secondary Movers: The quadriceps, hamstrings, and spinal erectors (back) contribute as well.
The degree to which these secondary muscles contribute depends heavily on the setup and technique you use.
Why the Hip Thrust Works: 3 Biomechanical Advantages
While the squat and deadlift are staple compound lifts, the hip thrust offers three distinct mechanical advantages for targeting the glutes:
- No Spinal Fatigue Limitations: Squats and deadlifts often fail to challenge the glutes to their full limit because the lower back fatigues or gives out first. In a hip thrust, the glutes can be taken to true fatigue without being limited by back or hamstring failure.
- Peak Tension at Terminal Hip Extension: Squats and deadlifts place maximum tension on the glutes in a hip-flexed position at the bottom of the movement; as you stand up toward lockout, tension drops off significantly. The hip thrust features an opposite resistance curve: the hardest point of the rep occurs at the very top, demanding maximal force output during terminal hip extension. Combining hip thrusts with squats and deadlifts allows you to challenge the glutes across distinct length-tension ranges.
- Horizontal Force Vector Matching: During upright sprinting, the foot contacts the ground at a relatively extended hip angle to produce horizontal propulsion. While squats and deadlifts train vertical force production where loads decrease near full extension, the hip thrust loads peak resistance horizontally at terminal extension, providing a direct contrast.
Step-by-Step Hip Thrust Execution
Executing the hip thrust correctly requires setting up specific landmarks before driving upward.
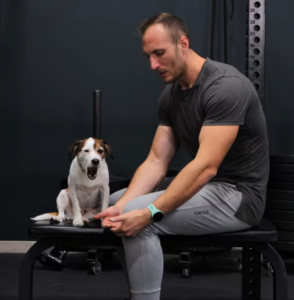
1. Establish Proper Bench Height
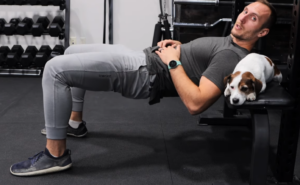
At the top of the thrust, your torso and thighs should form a flat, horizontal position.
- Locate the bony bump on the front of your shin, the tibial tuberosity.
- The top edge of your bench or box should align roughly with this height.
- If the bench is too high: You will substitute back extension for hip extension. Compensate by lowering the bench or elevating your feet onto a platform.
- If the bench is too low: The movement transitions into a standard floor glute bridge.
2. Anchor the Support Surface
Ensure your bench is firmly braced against a solid wall, heavily weighted down with plates, or fixed in place so it cannot tip or rock backward as you drive into it.
3. Dial In Foot Width, Flare, and Distance
- Width: Place your feet roughly hip-width apart. As a rule of thumb, you should be able to visualize your hips fitting cleanly between your feet. Setting feet too narrow compromises leverage and prevents full hip lockout.
- Toe Angle: Point your toes outward with a slight external rotation. Aligning foot flare with the anatomical angle of the glute muscle fibers promotes higher glute activation.
- Distance: Set your feet far enough out so that your shins remain completely vertical (90 degrees to the floor) at the top of the rep.
4. Position the Shoulder Blades
Rest your shoulder blades across the top edge of the bench. Dropping too low down against the side of the pad limits leverage, creates neck and upper-back discomfort, and restricts hip travel.
5. Cue the “Crunch and Squeeze”
Avoid overarching your spine to chase extra height. As you drive upward:
- Perform a mini-crunch by keeping your ribs down and chest pointed forward rather than letting it flare toward the ceiling.
- Squeeze the glutes aggressively into a posterior pelvic tilt, pulling your belt buckle toward your chin to finish the rep in full extension.
- Lower under control to the floor, either lightly touching down or reversing just above the turf, and repeat.
5 Common Hip Thrust Mistakes to Avoid
1. Feet Positioned Too Far Forward
Setting your feet too far away from the bench angles your shins forward away from your torso, shifting primary mechanical tension away from the glutes and directly into the hamstrings.
2. Feet Positioned Too Close to the Bench
Placing your feet too close pulls the knees out past the ankles, turning the lift into a quad-dominant movement and restricting hip extension via tension in the rectus femoris.
3. Narrow Stance Caused by Heavy Resistance Bands
Using excessively heavy resistance bands pulls the knees inward, forcing lifters to adopt a narrow stance. Evidence shows that wider feet and knee positions optimize gluteus maximus recruitment. If a band forces your feet inside hip-width, remove it.
4. Overarching the Lumbar Spine
Driving the hips as high as possible by hyperextending the lower back substitutes spinal extension for true hip extension. Keep the ribs down and lock the movement out through the hips, even if the absolute lockout height looks lower.
5. Shorting the Lockout
Cutting reps short before reaching neutral hip alignment eliminates the most valuable segment of the exercise. Select a load that permits complete, locked-out hip extension on every repetition.
Hip Thrust Variations and Loading Methods
Bodyweight resistance alone quickly ceases to provide sufficient overload for glute development. To drive progressive overload, utilize these loading variations:
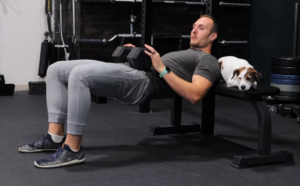
1. Dumbbell Hip Thrust
- Setup: Place a dumbbell directly across your hips and drive up.
- Limitations: As loads increase, maneuvering a heavy dumbbell into place across your lap becomes impractical. Furthermore, large dumbbell heads hit your thighs early, restricting full range of motion in the bottom position.
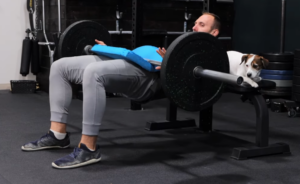
2. Barbell Hip Thrust (The Gold Standard)
- Setup: Roll a barbell loaded with standard-diameter plates (such as bumper plates or 45-lb / 135-lb iron plates) directly over your legs into position.
- Technique: Always utilize a thick barbell pad to distribute pressure across the hips. Keep your hands on the bar for control and place your elbows against the bench for structural stability.
- Benefits: Provides unrestricted hip flexion in the hole and offers the most practical mechanism for progressive overload over time.
3. Anchored Resistance Bands
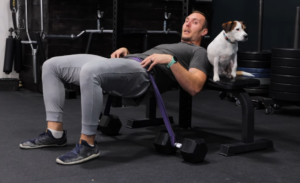
- Dual-Anchor Band Setup: Secure a heavy resistance band across your hips by anchoring each end beneath heavy dumbbells or dedicated hip-thrust pegs. This configuration concentrates tension at terminal extension.
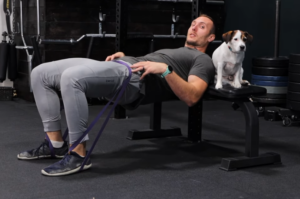
- Foot-Anchored Band Setup: Loop a continuous resistance band around both feet, pull the loop across your hips, and thrust against it. While resistance is lower, it provides a viable setup when fixed anchors are unavailable.
4. Light Knee Bands (Glute Medius Emphasis)
Adding a band around the knees introduces lateral abduction demands, but most commercial mini-bands are excessively stiff. Heavy bands force the knees inward, preventing proper alignment. Use an adjustable or light-resistance band (such as the Committed HP adjustable band) that adds mild lateral tension without overriding hip extension mechanics.
5. Single-Leg Hip Thrust
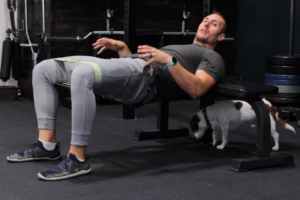
To overload the glutes without external equipment, transition to a unilateral hip thrust:
- Execution: Keep the non-working leg tucked in toward the chest rather than held completely straight. This prevents hip flexor fatigue or hamstring flexibility from limiting the movement.
- Upper Body Position: Unlike the barbell variation, position your elbows wide on the bench to maintain stability, manage balance, and counteract rotational torque throughout the rep.
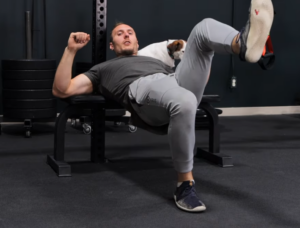
Build Your Performance with Citizen Athletics
Mastering movement mechanics is the foundation of building durable strength, athleticism, and muscle mass. If you are looking for structured, evidence-based strength and conditioning programs that take the guesswork out of your training, explore our programs at Citizen Athletics:
- Built for Athletics: Our premium training system engineered to optimize raw strength, power, and high-level movement efficiency.
- Sustainable Strength: The ultimate flagship framework designed for busy individuals looking to lift heavy, build muscle, and remain highly athletic for life.
Watch the Technical Breakdown
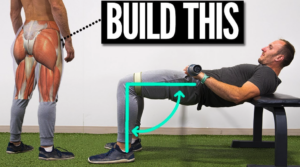
Prefer to see the full setup and visual execution in real time? Watch the complete coaching breakdown from Citizen Athletics here.